Last week we have a blog post about Azure Storage, but how to create the Azure Storage and not what and how can be done within the Storage account. I was aware of this thing and that’s why I separated the creation of the Azure Storage account and its functionalities. For those who missed last week’s blog post, click HERE. For this week we will go deeper into the functionalities and what can be done within the Azure Storage account. So let’s start …
The Storage that I have created last week, is still here so let’s start with the first page that we can see once we open the created Storage account.
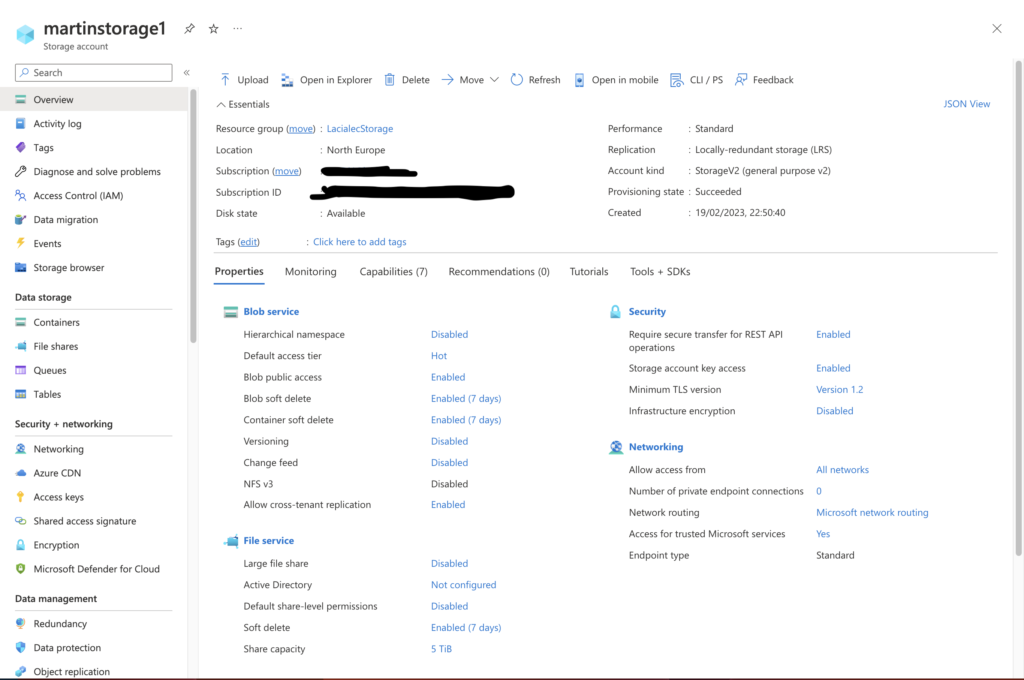
The first that we see (which is the same also for the other resources in Azure) will open the Overview page. The meaning of the overview page is to give you quickly the needed pieces of information about Storage, which means what is the location (region), what type of storage, what type of replication, when is created, and what is the resource group. On top of this as you can see from the picture above, the middle has more information like the Monitoring, Capabilities, Recommendations, Tool and etc, which gives us a lot of information on the home page of the created resource and we don’t need to search about it, everything that Is needed is here.
Very often when I am explaining any functionality of any service in Azure I am separating in categories, which means in this case we have 8 categories which are: Data Storage, Security + Monitoring, Data Management, Settings, Monitoring, Monitoring (classic), Automation and Support + Troubleshooting. The first couple of options that we have below Overview are on most of the Azure Resources are default ones, which means Overview, Activity Log, Tags, Diagnose and solve problems, Access control (IAM) we have on all of the Azure resources it doesn’t matter what we will create.
We saw the Overview tab, now let’s check the next one what is his job 🙂
Activity log: This is a platform log in Azure that provides insight into the subscription-level events, for example, if the Storage account is modified, the keys are regenerated, and the access is changed, all of this information can be found here.
Tags: I suppose most of you are aware of them, but one more time to remind you, Tags are name/value pairs that enable you to categorize resources and view (if needed) consolidated billing by applying the same tag for multiple resources or resource groups.
Diagnose and solve problems: This option is very often used when you need to troubleshoot common issues with your storage, additionally, you can perform a search for symptoms and choose a diagnostic category that best describes the issue.
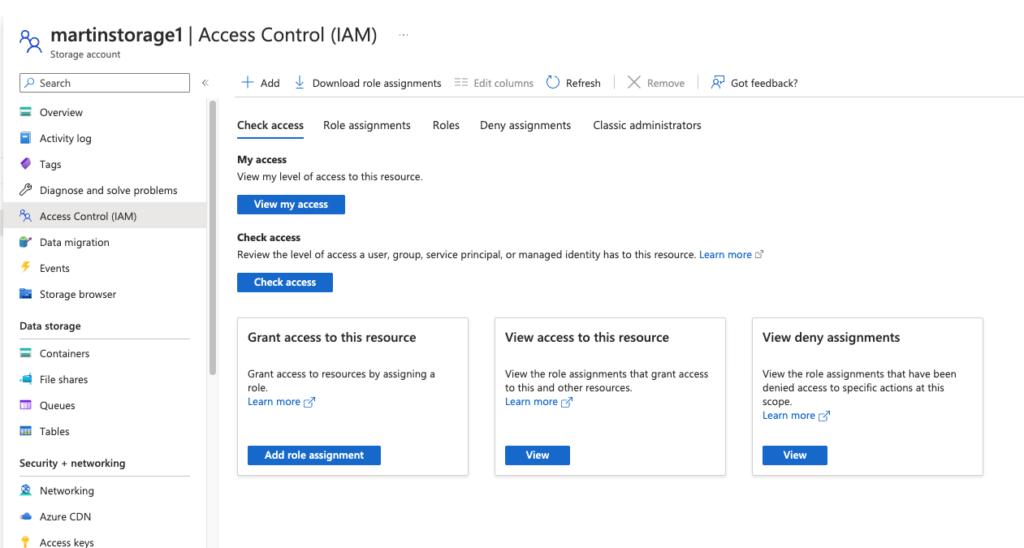
Access Control (IAM): When you need to assign roles to grant access to Azure resources, this is the place that you need to know it. IAM stands for Identity and access management which means from this place you grant, or remove access to the needed identity (person).
After we know where we can grant or remove access now we can continue to the next one which is called:
Data migration – Microsoft is trying everything just to help all of us (Customers), which means you can easily here select how you want to migrate your storage and then they provide you with the best option that fits you.
Events – This option means that if you create an application you can easily allow to the application to react to events, for example creating blobs, deleting blobs without code, or pooling services. Or to automate things within your storage that are connected with some application, so you don’t need to lose time, the event can do that for you.
The last option that we have from the first part is called Storage browser, which means browsing within the storage but in the Blobs, File Shares, Queues, or Tables where you can easily navigate and if it’s needed something to download or upload directly from there.
Tip: When I found storage with a lot of things, data, DB’s, containers or etc very often I am using Storage Explorer Desktop app that can be downloaded HERE.
Now we are starting with the first category called Data Storage.
- Containers – If you need to store a large amount of UNSTRUCTURED object data, this is where you need to upload. The containers are specially created for unstructured and different types of data where we can use them. Within the container, we can also specify, and modify the access level.
- File Shares – One of my favorite options within the Azure Storage account :). This is a way where you can store and access files in the cloud using the SMB protocol, which means you can create a file share and then easily map even on your local computer but also use it for transferring data from one place to another.
- Queues – When you need to store a huge amount of messages and need to be accessed them from anywhere via HTTP or HTTPS, you need Queues. Queues messages can be up to 64 KB in size, and also may contain millions of messages up to the total capacity limit of the storage.
- Tables – If the Containers are for unstructured object data then the Tables are for opposite or non-relational structured data. This service is a NoSQL datastore which means accepts authenticated calls from inside or outside Azure.
With this, we are finishing our first category Data storage, and continuing to the 2nd one called: Security + Management.
In this category, we have 6th options and they are:
- Networking – In this option, we can select WHO can access our storage. Within the networking, we have Firewall and virtual networks, Private endpoint connections, and Custom domains. Depending on our needs we can configure how our storage to be accessed over the network.
- Azure CDN – Azure Content delivery network within the Storage account means allow us to cache content from our Storage account on a global network of edge servers. With this, we can improve the performance and availability of our static website or blob service. On top of this if you want to use you will need to create a CDN profile plus an endpoint that points to the Storage account.
- Access Keys – These keys are secret keys that allow us to authenticate the requests to our Storage account. Each of the storage accounts has two access keys that can be viewed or copied. When it comes to this please don’t forget as an easier way a policy that can do automatic rotation.
- Shared access signature – This is a URI that grants limited access rights to our Azure Storage without exposing the key. The short name is SAS and can be created in 3 different types: account SAS, service SAS, or User delegation SAS. SAS specifies its constraints such as which resources the client can access, what permissions the client will have, and how long the SAS will be valid.
- Encryption – This is a feature that automatically encrypts your data before it’s stored in the cloud and decrypts when we retrieve it. This Storage encryption uses 256-bit AES, which is one of the strongest block ciphers. We have two types of encryption one is Microsoft Managed keys and 2nd Customer managed keys which means that if you have your own you can encrypt the data.
- Microsoft Defender for Cloud – As the last one from this category we have Defender which is a cloud-native application protection platform (CNAPP) that provides security for cloud-based applications. The Defender for Storage is a feature of Microsoft Defender for Cloud that detects and alerts us of unusual and potentially harmful attempts to access or exploit our Storage accounts.
The next category that we have within the Storage account is called Data Management. This category has 7 options that we can adjust for our Storage account.
- Redundancy – When you want to see how is your data replicated in Azure, this option is needed for you. Basically, redundancy helps us to protect our data from planned and unplanned events, such as hardware failures, network outages, or natural disasters. There are different types of redundancy, which we explained in our previous post.
- Data protection – You should always have a plan B in case the data is deleted or modified, to protect your data from accidental things you will need to adjust this functionality within the Azure Storage account.
- Object replication – Very often when we need to give data to developers or Q&A to play a little bit we are not giving them the production data of course, so we have this option in Azure Storage where we can replicate from one blob to another storage account anywhere in Azure. Is not just for developers or Q&A, but also for optimizing data across regions, disaster recovery, and high availability, or for data processing and transformation.
- Blob inventory – Sometimes when we use one storage account we got a lot of containers, blobs, snapshots and etc and we lose control over what we have and what we don’t have in our Storage accounts. Blob inventory is a feature that can help us to understand in one report the total data size, age, encryption status, and legal hold.
- Static website – On top of all of these features in the Storage account, we have the option also to host a static website on blob storage. A static website that consists of HTML, CSS, JavaScript, and image files that can be rendered by the web browser.
- Lifecycle management – If you need to move blobs, between access tiers or delete dependence on the frequency of data because of some storage costs or performance, you need to use Lifecycle management. What you need to do, is just to define a rule-based policy that specifies the actions and conditions for our blobs.
- Azure search – This is the only service that is a combination of 2 services: Azure Storage + Azure Cognitive Search. We know what is Azure storage, but what we don’t know is what is Azure Cognitive Search. Azure Cognitive Search is a service that enables us to create a big search experience over our data using AI-powered indexing and querying capabilities. Which means Storage for the data + Indexing and querying using AI.
We are coming to our next category, which is called Settings.
- Configuration – If you need to customize various aspects of your storage account, like security, performance, access, or replication you need to check this option and adjust your Storage Account.
- Data Lake Gen2 upgrade – This is a feature that combines the scalability and cost benefits of object storage with the reliability and performance of a hierarchical namespace. Very often used when it needed to be upgraded from Blob storage.
- Resource sharing (CORS) – CORS stands for Cross-Origin Resource Sharing, which means it’s an HTTP feature that allows a web application running under one domain to access resources from another domain. Azure Storage supports CORS for all of the Data Storage services: Blobs, Table, Queue, and File Services.
- Advisor recommendations – When you need advice for best practices for any Azure Service you can find that under Advisor recommendations. This is a service that is proactive, actionable, and personalized best practices recommendations to help us to optimize the cost, performance, security, and reliability.
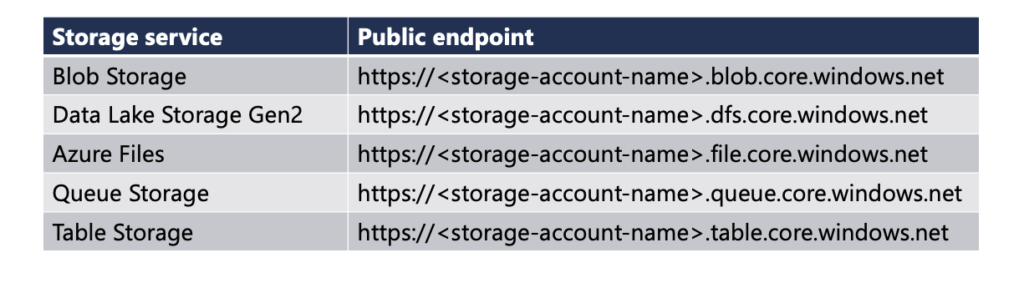
- Endpoints – These endpoints are the URLs that you use to access the data stored in Storage account. This means they include unique account names and service names such as blobs, files, queues, or tables.
- Locks – When you need to protect your storage from accidental deletion or modification you need to use the Azure Resource Locks. You can apply a lock at the resource group level or at the individual resource level. There are two types of locks: Read-only and Delete.
We have a couple more categories and the next one is Monitoring.
- Insights – This is a feature of Azure Monitor that provides us with a unified view of our Storage account service’s performance, capacity, and availability. With this feature, we can identify storage accounts with no or low use, analyze the performance and latency or troubleshoot issues with our storage and check the metrics and logs.
- Alerts – If you need to create an alert based on metrics or logs you can do that from here. You can use the alerts to notify certain condition or threshold that is met, and trigger automated actions, such as running logic apps or sending an email, or calling a webhook.
- Metrics – When you need a series of values stored with a time-stamp that provides a unified view into the performance and availability of our storage account, metrics is the place. This service included aggregated transaction statistics and capacity data about requests to a storage account.
- Workbooks – Interactive reports that allow us to analyze and visualize metrics data from our storage account. We can create the workbooks using a flexible canvas that supports multiple data sources from across Azure.
- Diagnostic settings – Configuration that enables us to collect platform logs and metrics data from our storage account. We can use these logs to send data to Azure Monitor Logs, Event hubs, or Storage accounts.
- Logs – Data objects that store detailed information about successful or failed requests to our storage. We can use these logs to trace requests and analyze and diagnose issues within our Storage account.
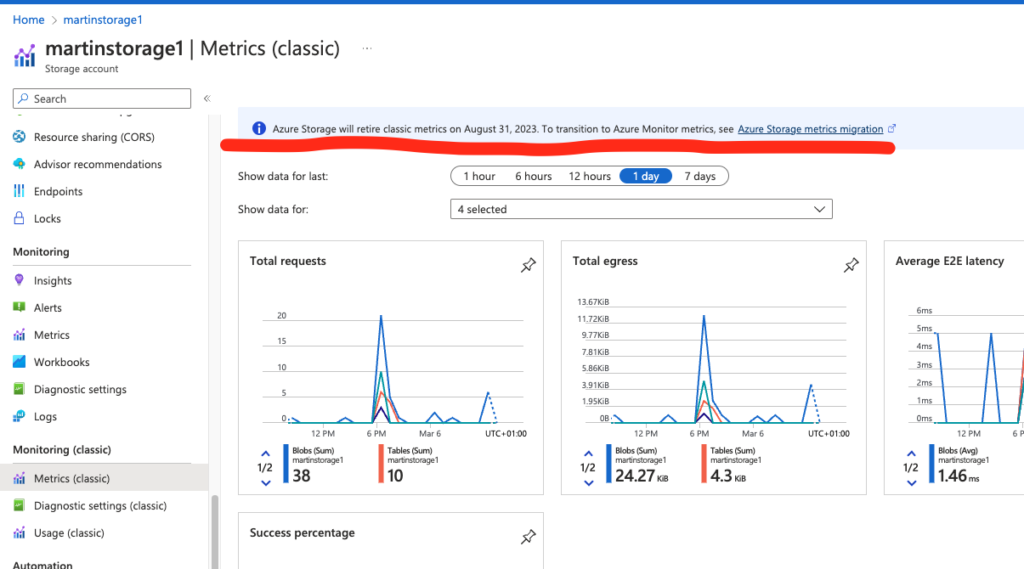
The next one is Monitoring (classic) this category is basically the same as the topics that we mentioned above and this category will be retired this year end of August.
As we mentioned the previous 2 categories are the same and the topics are overlapping so we can skip it and continue on to the next one called Automation.
We have just two options in this category so :
- Tasks (preview) – This feature allows us to create automation tasks for managing and monitoring our Storage. We can use this for copying blobs, deleting containers or sending alerts without any action from our side.
- Export template – If you need a template from your already created Storage account, you can easily download it from here, which means tomorrow if you need to deploy the same Storage to another region you don’t need to do the same manual steps you can just easily upload the template files from this and your job is done there 🙂
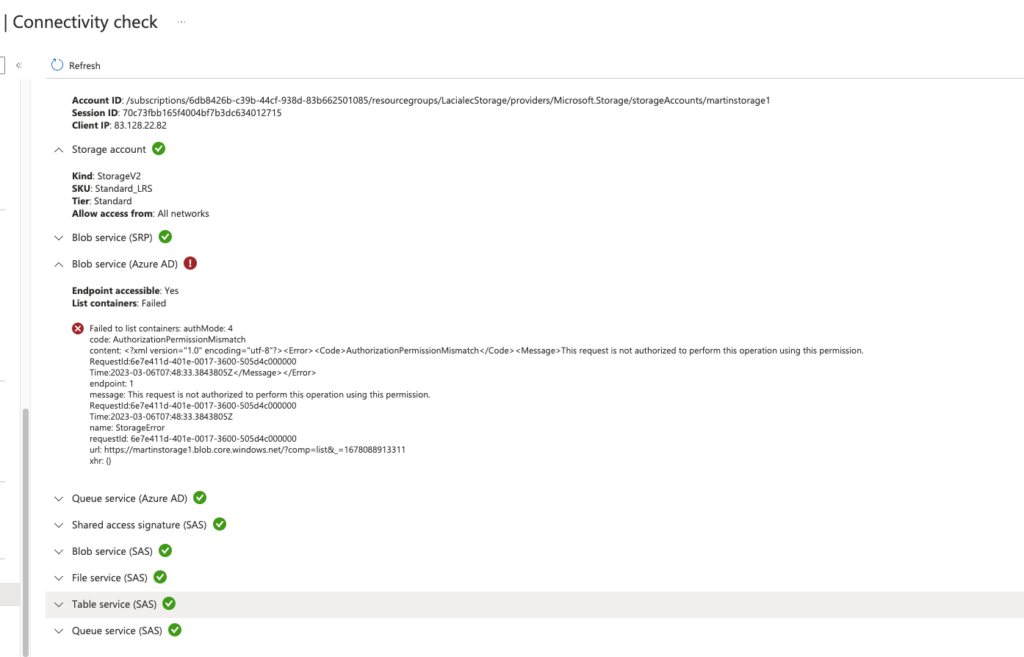
Our last category Support + Troubleshooting is more about how health is your Resource in Azure. For example, Resource health gives you information if your Storage was available on a specific date. The Connectivity check gives you information from a network perspective for example your Storage can be accessed or not.
The option Recover Deleted account is renamed to Restore and moved to the commands section.
The last option that we have is called New Support Requests, which means creating a ticket if you have any issues with your service and send to Microsoft.
With this part we are finalizing the Storage account topic, basically, we cover all of the things that were confusing some of you, but now you can easily check the previous post let’s call it part 1 and then you can see this post which is part 2.
The post was separated like this just because I don’t want you to read a book, I want when somebody wants to create a Storage to check the needed information and to be aware of why the options are there and what is the meaning of it, the same like this post if you create a Storage what you can do you can find everything here.
See you next week …