We are living in an era where most of our things are stored somewhere. Yes maybe in the past it was different, local drive, external drive, USB drive, but now it is entirely opposite. I suppose some of you will remind yourself when you forgot the CD, USB, or the Floppy with the word document that you were typing all night long and then running back home and back to work, university, or school where this word document was needed.
Time has changed significantly, especially with Onedrive, Dropbox, and Google Drive, because after that nothing from the above-mentioned was needed to us, everything was online and most important can be accessed anytime from anywhere.
This was a huge impact on all of us, especially when we know that you don’t need to delete or format your USB after 100 times or buy a new CD.
That’s how everything started, so by my logic, this was Starting of the vehicle and everything after that is just a continuous journey around the “world” (world = storing your data everywhere).
If this was a huge impact and benefit (positive one) for the normal users, you can imagine how positive was this for the Tech persons that every day are sharing files, projects, and data. If you can’t imagine I can tell you. THIS IS THE BEST THING THAT CAN EVER HAPPEN.
As a personal user, I am really happy to use this service. I am using it OneDrive and GoogleDrive and the first benefit is that any file, any picture for me is accessible from anywhere it doesn’t matter where I am located. 2nd thing is if I lose my phone or my computer I know that the data CAN’T be accessed so easily, so I am already happy with that. For me as a normal user, this is perfect.
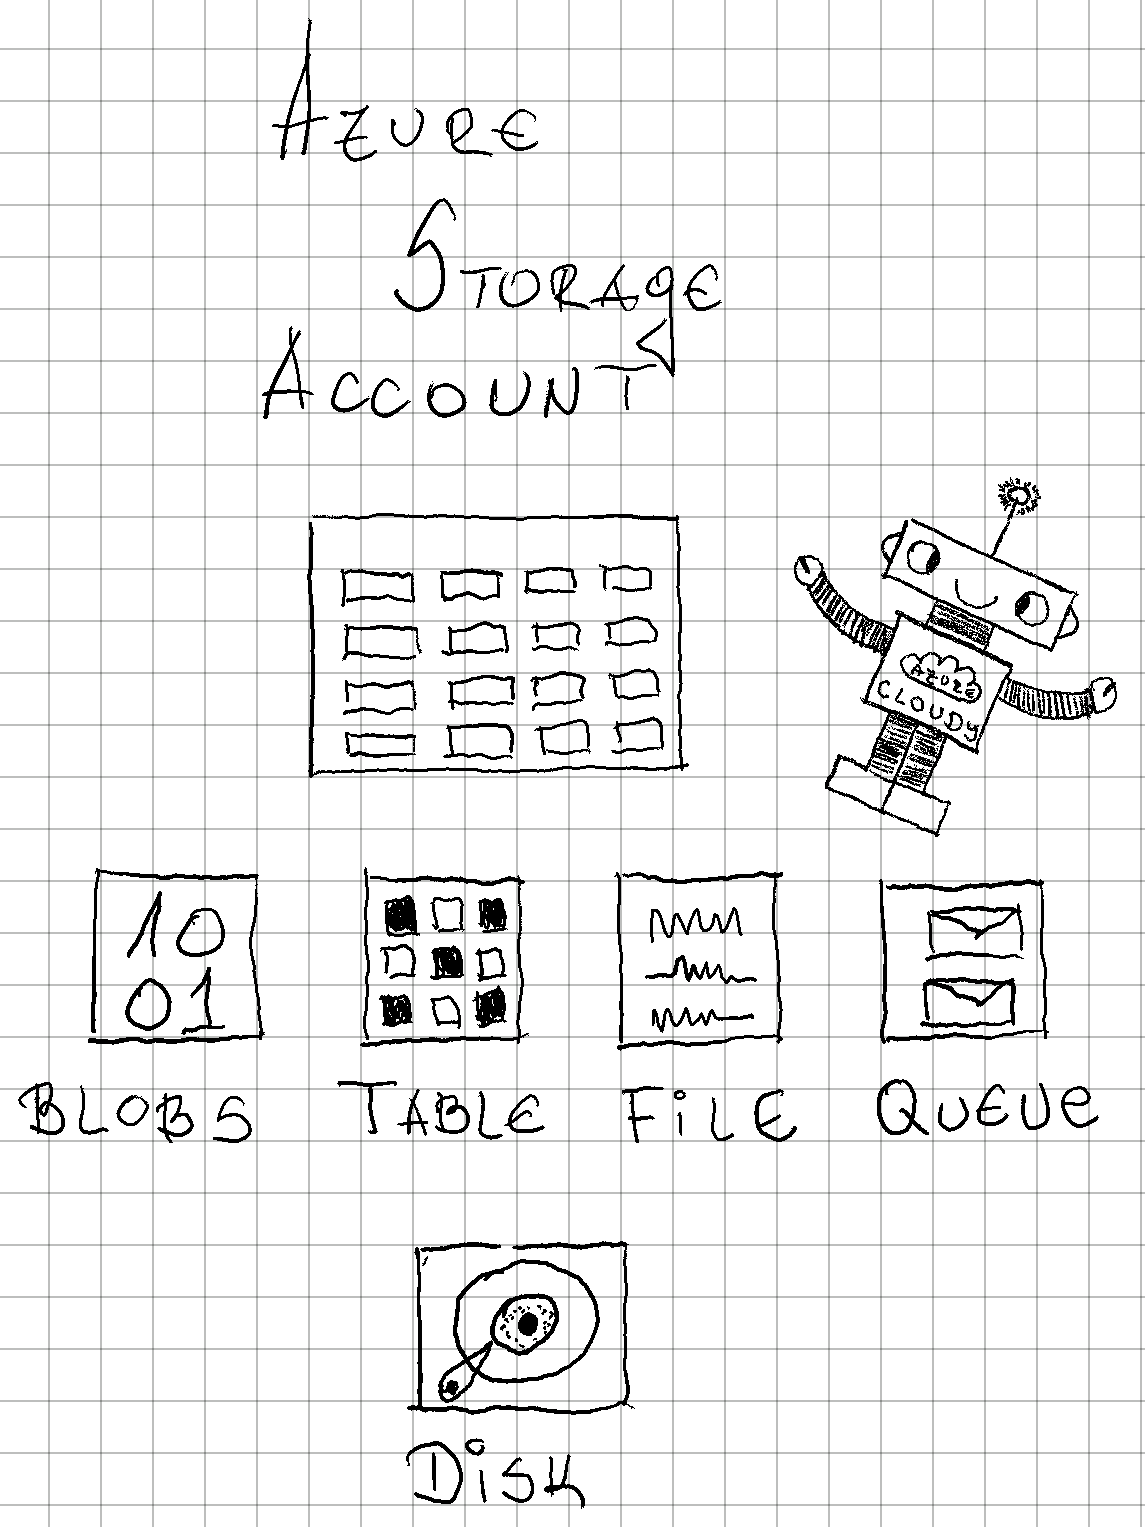
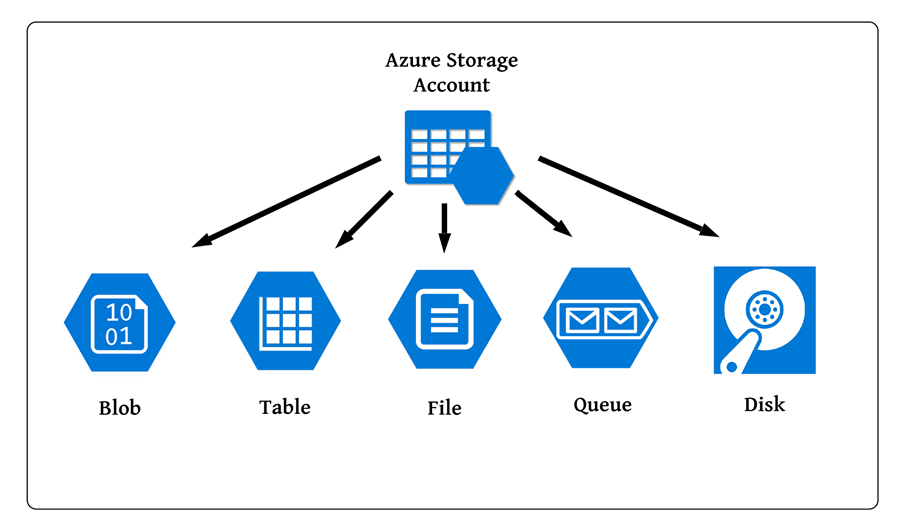
As a Tech user so far most used service in my Azure Dashboard is, Azure Storage Account. But before continuing deep about it let’s start from the begging.
Azure Storage is a cloud-based storage solution in Azure. It’s a scalable, secure service that enables to us to store and access large amounts of data. The types of data that can be stored in Azure Storage are Blobs, Files, Queues, Tables, and Disks.
What is the purpose of Azure Storage?
The purpose of Azure Storage is that provides high availability and durability, where multiple copies of our data stored access different regions and have automatic failover in case of an outage. If that is not enough for you, Azure Storage has data encryption, access control, and automatic data tiering which will allow us to optimize our costs when we store data in the Azure Cloud.
So let’s create Azure storage. First of all, we find the Storage accounts in Azure and press Create. Once we press Create we will get a new window that looks like this.
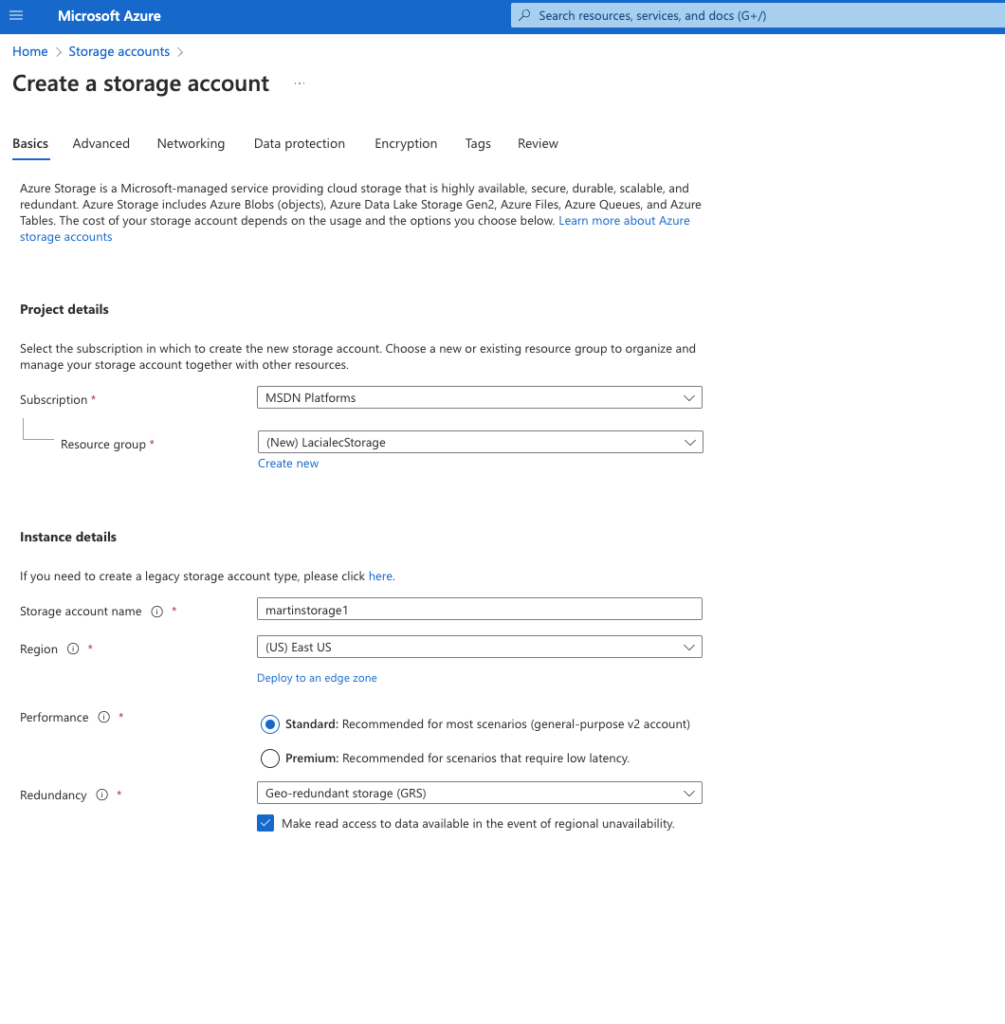
As you can see the first 2 options that we get are the Subscription and Resource groups. For those who are still thinking about what was Subscription or Resource Group is, click here.
We put the name of our Storage and then we need to choose a Region. The region is the place where our data will be stored basically in which country is around the world, if you’re creating the Storage for testing purposes as a tip I can tell you to use East us, and East us 2 as the cheapest regions.
The next option that we need to choose is Performance. In Azure, we have two types of performance, Standard and Premium.
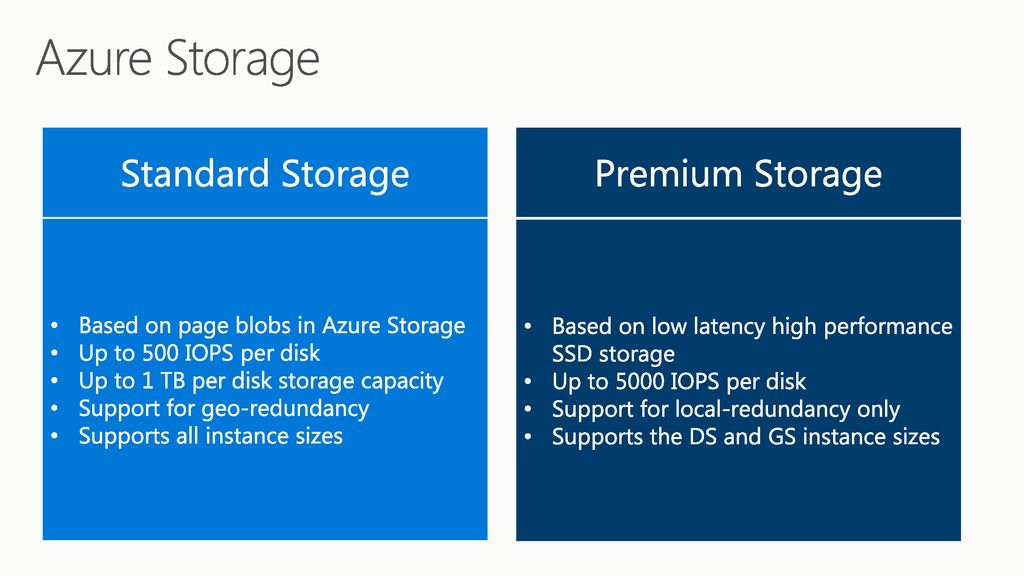
This performance type is based mostly on the question of how I will use my Azure Storage account.
My experience says that for most of the scenarios, you can use Standard without any problem, so far I was using the Standard one in a lot of projects, but also for private use for storing pictures, files, dbs and etc and it works really nice. So far I was using the Premium type (i think 20/30 times) but it was because I was working on big projects with a lot of data first, but also with a lot of different people that need to store data there, and the most important that data needed to be accessible very fast without any latency, well, in that case, I would say premium. If that is not the case feel free and try the Standard one you will be surprised how good it is.
My Conclusion is that depends on the requirements and for what you will use that Storage, not every time is needed premium.
The next option that we need to choose is Redundancy, or to be more direct should the storage be replicated somewhere?
Azure Storage gives us a couple of options like in the picture below. Please take into consideration that EVERY REGION OFFERS DIFFERENT OPTIONS, which means not every region can give the same options like this.
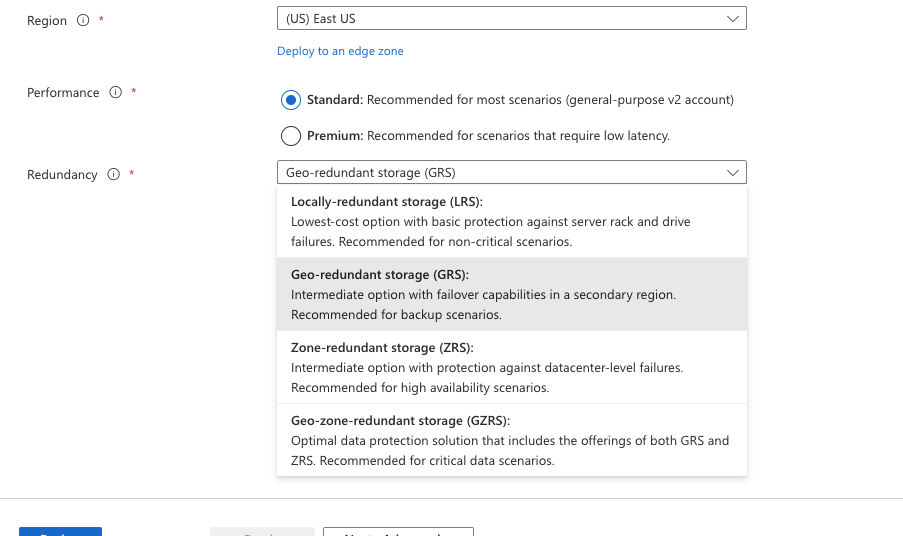
Azure Storage gives us four options for redundancy:
- Locally-Redundant Storage (LRS) – Low-cost redundancy which means synchronously replicating data to three disks within the data center in the primary region.
- Geo-Redundant Storage (GRS) – Provides additional redundancy, which means the three copies that we mention in LRS are included + secondary LRS of the disks in another region. This means if something happens in the first region in our case East US, the data will still be available because it will have three more disks in another region
- Zone-Redundant Storage (ZRS) – This type of replication is performed across three Azure Availability zones. That means that every Availability zone is an individual physical location and it’s independent of networking, power, and cooling. What is most important with this type of replication is that ZRS provides a minimum of 99,999999 % durability.
- Geo-Zone-Redundant storage (GZRS) – This type of redundancy is similar to or a combination of LRS + ZRS, which means your data is replicated across three Azure Availability zones in one region but also replicates into the single data center in a secondary region.
Maybe it sounds a little bit confusing, but on Friday with the Cloudy we will visualize and it will be clear to you how this replication is working.
Because I will use this storage for testing purposes I will use the Locally-Redundant. What I am really happy about is that this is the lowest type of Replication, which means even the lowest one makes three copies of your code or data and you don’t need to worry.
After we are done with the first page we go next and there is the 2nd page called: Advanced.
The Advance tab is focused in four categories:
- Security
- Data Lake Storage Gen2
- Blob Storage
- Azure Files
Let’s go one by one.
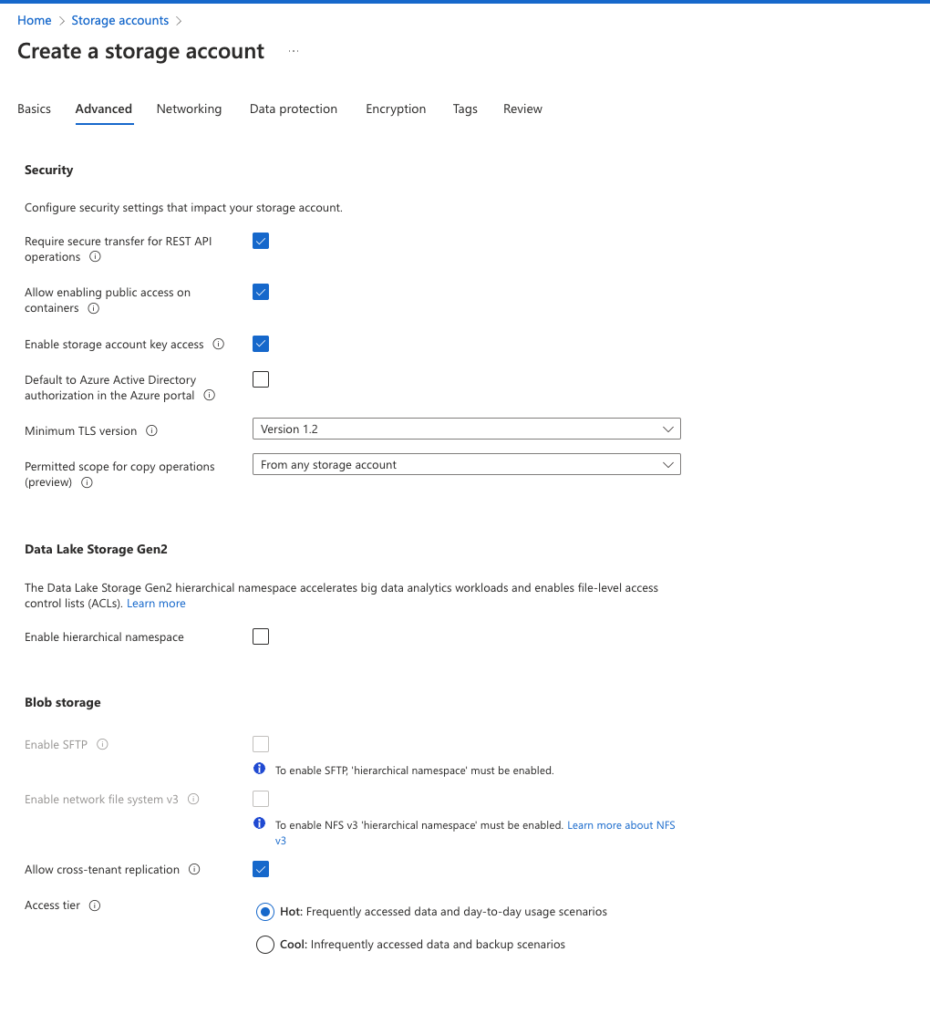
Security
In this category the settings are mostly based on the impact of the storage account, as we can see also on the above picture here we have six options.
- Require secure transfer for REST API operations – With this option, we are allowing our Storage account REST API operations with HTTPS requests. HTTP requests will be all rejected.
- Allow enabling public access on containers – Blob Containers by default do not allow access to their content. With this option, the authorized user allows public access to the content within the container.
- Enable Storage account key access – This means if you’re using the SAS option within the Storage account if this option is not ticked you can’t use it.
- Default to AAD authorization in the Azure Portal – When this option is ticked Azure portal authorizes the requests to blob, queues, and tables by default.
- Minimum TLS version – Depending of the needs of the application you can configure from here the TLS version.
- Permitted scope for copy operations – You can from here restrict the copy operation from source storage accounts that are within the same AAD tenant.
After we have seen the Security category, our next category is just one option (for now) which is:
Data Lake Storage Gen2 is about
- Enable hierarchical namespace – With this option, we enable the big data workloads and file-level access control lists to the storage account.
Our third one is called Blob Storage (our next post will be deep drive in the Storage account so for now please ignore this term)
In this category we have a couple of options so:
- Enable SFTP – To enable this option is dependent on our previous one, which means if we want to enable this one we must enable the previous one also, if you want to use the SFTP protocol
- Enable Network File System v3 – We have the same situation, dependency from the hierarchical namespace but also this option can be enabled just when we create the storage and not after that.
- Allow cross-tenant replication – With this option, we are enabling replication across different tenants, and organizations.
- Access Tiers – Hot & Cool – Always HOT because is used for most of the time of the scenarios or let’s say 99 % of the time and there is 1 % which goes for COOL if you are using the storage for BACKUPS. So the difference between HOT & COOL is only one, is the Storage used very often (then use HOT) or once/twice per month (then use COOL)
Our last category is called:
Azure Files
- Enable large file share – With this option, we are enabling file share support till 100 TB, the default one that we will get once we create the Storage account is 5TB.
With this, we are closing the Advanced tab and going to the next one called Networking.
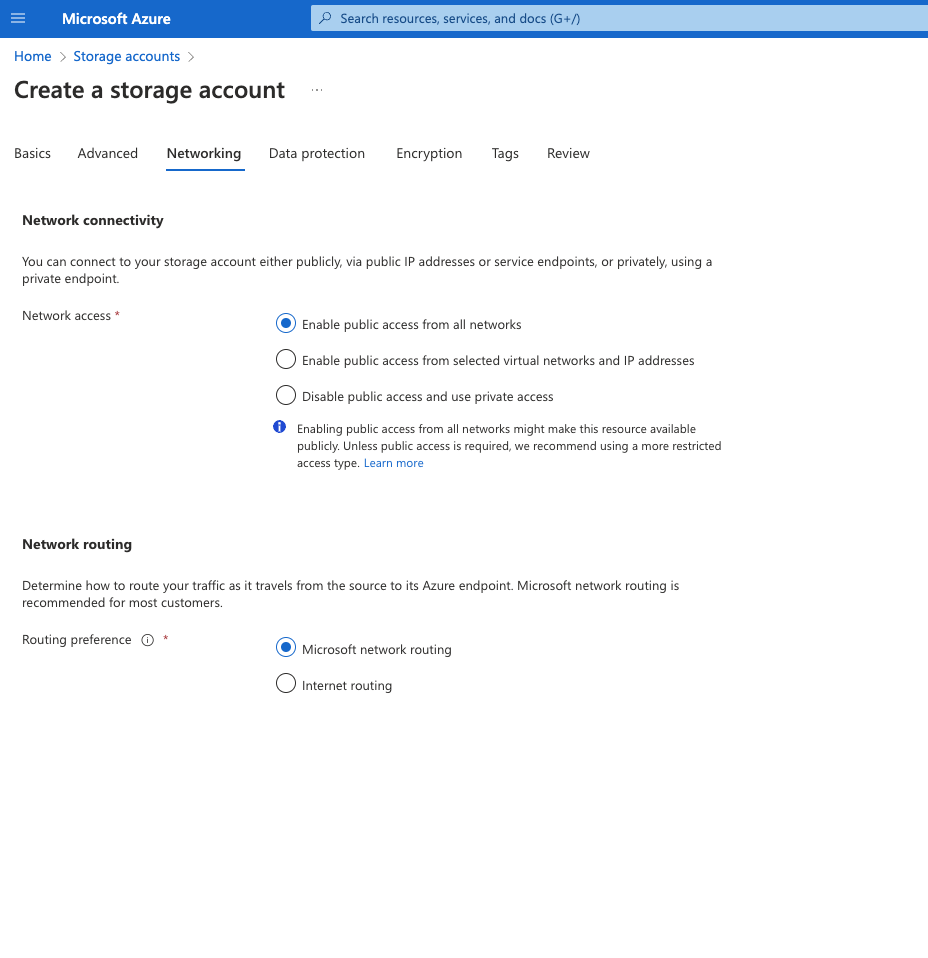
When it comes to the network configuration within the Azure Storage account, we have two options, one connectivity, and the second routing.
In the Network connectivity, we have three options.
- Enable public access – With this option we are enabling this Storage account to be accessed publicly, which means if somebody knows the URL address can access this storage.
- Enable public access from selected Vnet and Ip address – This option restricts access to the Storage, which means you select which Virtual network and which Ip address can access these Storage accounts.
- Disable public access and use private access – With this option, we completely block public access and just with Private endpoint connection will be allowed to these Storage accounts.
So far my experience is with all three options so I can make some type of conclusion like this. The first one can be used for any type of testing, playground. The 2nd one should be used for scenarios for serious projects, applications, and small companies where just Virtual networks within the subscription can access this Storage account. The 3rd one is mostly used in enterprise companies where they have confidential data and access should be very restricted.
When it comes to the network routing options we have two.
- Microsoft network routing – This will route direct traffic via the Microsoft Global Network which is one of the largest networks on the globe-spanning over 106.000 miles of fiber. Or how that will look alike is like this :
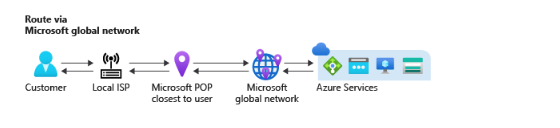
- Internet Routing – This routing options is not using the MS network, but the ISP network to route your traffic, or that will look like this

From the routing topic, my experience is to use the MS network routing just because most of the services that I am using are going throw that network. In case you need to use the Express route or somewhere doesn’t have the MS routing option you can use of course ISP routing.
Basic tab = done, Advanced tab = done, Networking tab = done, our next tab is called:
Data Protection
This tab is mostly on how you want to protect the data, manage the versions, and access control.
So we have three categories, so let’s start with the first one called,
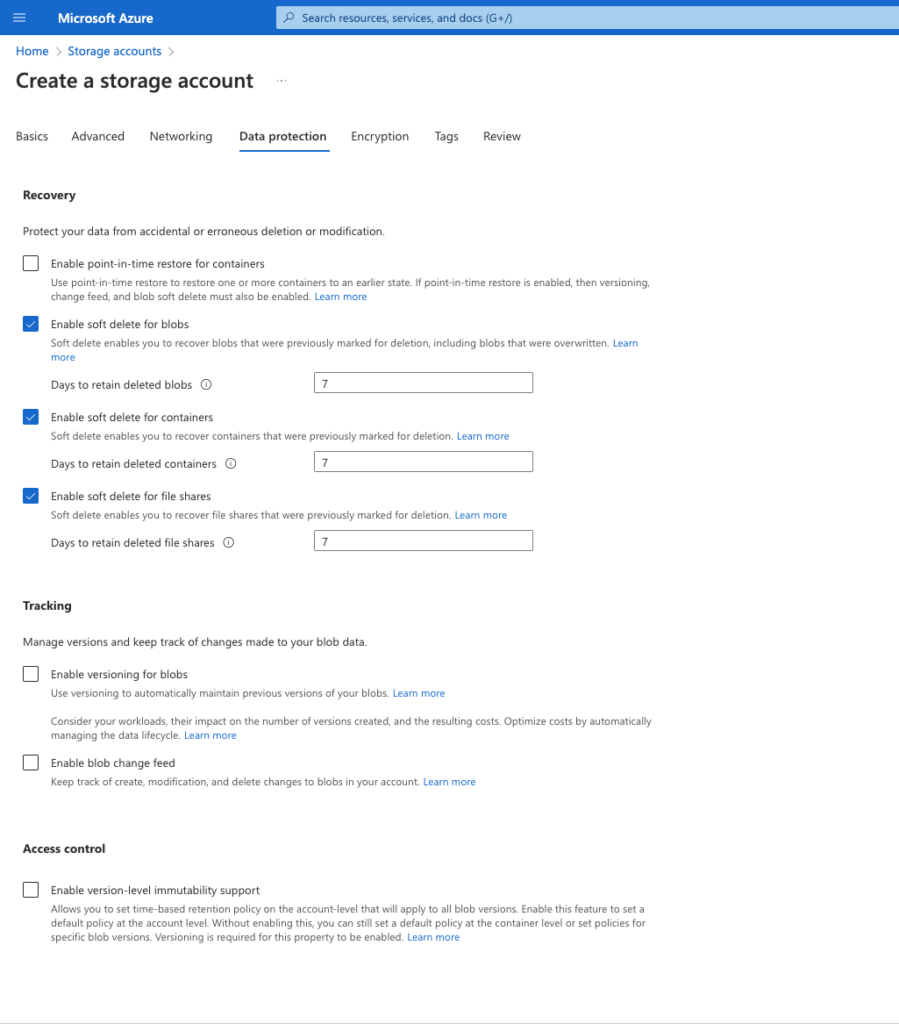
Recovery
- Enable point-in-time restore for containers – This option is used to restore one or more containers from an earlier state
- Enable soft delete for blobs – This option enables us to recover blobs that previously we marked for deletion in the text box you can put the days and how long to retain them.
- Enable soft delete for containers – The same option as the previous one but this one is specifically for containers.
- Enable soft delete for File Shares- The same as the previous two options, this one is specifically for File Shares.
After the Recovery category, we have the next category called:
Tracking
- Enable versioning for blobs – with this option you can automatically maintain the previous versions of your blobs.
- Enable Blob Change feed – If you want to keep track of the creation, modification, or deletion of the blobs tick this check box.
Our last category in the Data Protection tab is called:
Access Control
- Enable version-level immutability support – When you want to use a time-based retention policy on the account level that will apply to all blob versions.
Once we configured the tabs for access, and type of storage and it came to the tab for Encrypting and Security the content on the Storage. So our next tab is called
Encryption
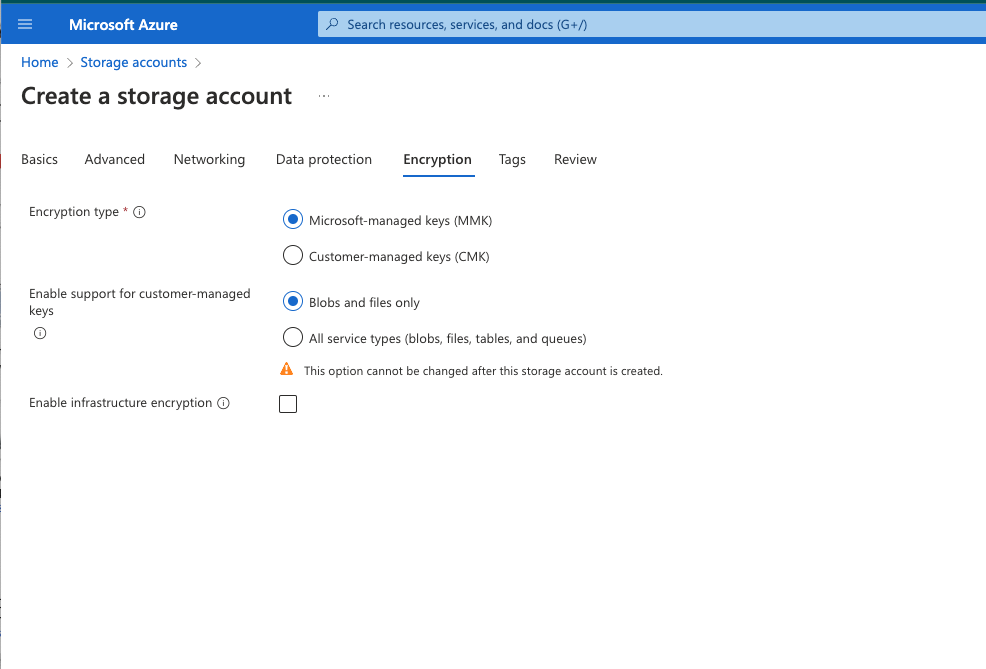
In this tab we have three options:
Encryption type :
- Microsoft – Managed keys (MMK) – This means that the encryption keys are managed by Microsoft
- Customer – Managed keys (CMK) – This means that the keys are managed by the customer or by us.
The next one that we have here is the:
Enable support for Customer – Managed keys:
If in the previous step, we select the CMK option then we should configure for what the service types in the storage we want to use.
- Blobs and Files only – which means the CMK will be used just for blobs and files
- All service types – which means that the CMK will be used for all service types in the Storage.
The last option that we have in the Encryption tab is:
- Enable infrastructure encryption – If you want to have 2nd layer of encryption on your storage account you should tick this option.
After we configured most of the important settings about the Storage account, it left our last one which I think most of you know about it and it’s called Tags. For those who don’t know or missed the previous posts, Tags are used as names/values that enable the categorization of resources and view consolidated billing.
I will keep it empty and just click Review and Create.

After one minute our Storage account is successfully created.
I think we all notice how big and how many settings and options are available within the Azure Storage account. Because first I want you to understand what are the options and what things you can configure when you create Azure Storage, additional on this we didn’t mention at all things like Blobs, SAS, Storage Browser, and Data migrations which are options once you create the storage.
For those who are a little bit struggling and are confused about some of the Storage options, please feel free to use the comment section, I can say that in the coming Friday, I will try my best to visualize and show you how things are workings because I notice even for me when I visualize or draw it on a paper some things are easier to understand, so what I want to say CLOUDY is here and DON’T WORRY be HAPPY.
Azure ROCKSTAR is a continuous journey and we are getting there.